Laravel Framework
คือ PHP Framework ตัวหนึ่งที่ถูกออกแบบมาเพื่อพัฒนาเว็บแอพพลิเคชั่นต่างๆ
ในรูปแบบ MVC (Model Views Controller) ซึ่งมีการแบ่งโค้ดของระบบออกเป็น 3 ส่วน ได้แก่ Model, View และ Controller ตามชื่อที่เรียกเลย ซึ่งแต่ละส่วนก็จะมีหน้าที่แตกต่างกันไป
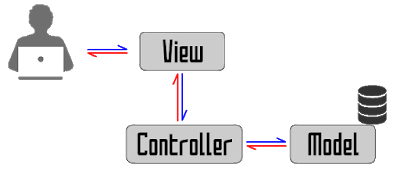
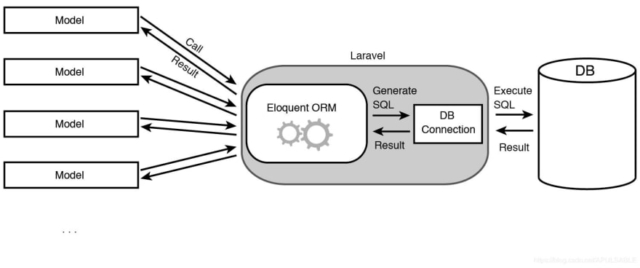
Model คือ โค้ดส่วนที่ใช้สำหรับติดต่อกับฐานข้อมูล จัดการนำข้อมูลเข้าหรือออกจากฐานข้อมูล เพื่อนำไปประมวลผล
View คือ โค้ดส่วนที่ใช้แสดงผลออกทางหน้าจอ เพื่อติดต่อรับคำสั่งหรือข้อมูลจากผู้ใช้งาน
Controller คือ โค้ดส่วนที่ใช้ประมวลผลการทำงานตามที่ได้รับคำสั่งหรือข้อมูลจากผู้ใช้งาน เป็นส่วนที่ควบคุมการทำงานของระบบ
มีจุดเด่นและข้อดีคือ ทำให้การเขียนโค้ดของเรานั้น ดูสะอาดสามารถอ่านและแก้ไขได้ง่าย แถมยังสามารถดาวน์โหลดมาใช้งานได้ฟรี ๆ โดยผู้พัฒนาคือ นาย Taylor Otwell ภายใต้ลิขสิทธิ์ของ MIT และ Source Code ได้ถูกเก็บไว้บน Host ของ Github ซึ่งในปัจจุบันกำลังเป็นที่นิยมนำมาใช้งานอย่างแพร่หลายทำให้สามารถหาข้อมูลหรือตัวอย่างเกี่ยวกับตัว Laravel Framework ได้อย่างง่ายดาย หมดห่วงเมื่อติดปัญหาที่คิดไม่ตกหรือแก้ไม่ได้เพราะสามารถหาข้อมูลดูได้ทางอินเทอร์เน็ต อีกทั้งตัว Laravel นั้นยังมีการอัพเดทอยู่ตลอดเวลาทำให้เรามั่นใจได้ว่า Framework นี้จะยังคงมีการพัฒนาต่อไปเรื่อยๆ นั้นเอง
โครงสร้างของ Laravel Framwork
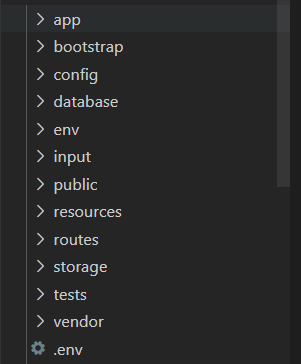
หน้าที่ของโฟลเดอร์และไฟล์ที่มือใหม่ควรรู้
* app เป็นโฟลเดอร์ที่ใช้เก็บไฟล์เช่น Model หรือ Controller ที่ใช้ในการประมวลผลและเชื่อมต่อกับฐานข้อมูล
* database เป็นโฟลเดอร์ที่ใช้เก็บไฟล์เกี่ยวกับ Migrations และ Seeding เพื่อใช้ในการสร้าง Table หรือใส่ข้อมูลในฐานข้อมูลผ่านคำสั่ง “artisan”
* public ใช้เก็บพวก Javascript, CSS รวมไปถึง File index และ .htaccess โดยเป็นตัวจัดการไฟล์ที่สามารถเข้าถึงได้
* resources ใช้เก็บโฟลเดอร์ที่ใช้ในส่วนของการแสดงผลต่าง ๆ (Views และส่วนที่เกี่ยวข้อง ฯ)
* routes เป็นส่วนที่ใช้เก็บไฟล์ในการกำหนด Url ของ web (File routes)
* storage เป็นส่วนของคลังพื้นที่จัดเก็บข้อมูลตระกูล Session, caches หรือไฟล์ที่ถูกทาง blade engine ทำการ compiled มาแล้ว
* tests เป็นส่วนที่ใช้จัดการพวก automated tests เช่น unit test
* .env เป็นไฟล์ที่ใช้ config laravel กับ ฐานข้อมูล
จุดเด่นของ Laravel Framework
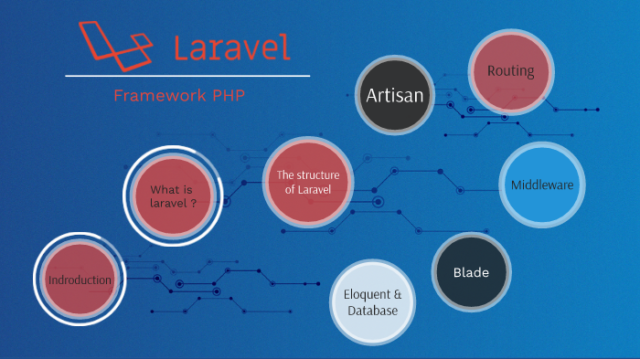
* ส่วนขยายของ Laravel ที่ชื่อว่า Bundle ซึ่งช่วยให้ประหยัดเวลาในการเขียน Code ลงเป็นอย่างมากโดยใช้คำสั่งผ่าน Command Line ในการติดตั้งผ่านคำสั่ง “php artisan” แทน
* Unit testing สามารถสร้าง Unit test ขึ้นมาเพื่อทดสอบงานของตัวเองได้ โดยสร้างผ่านชุดคำสั่ง สามารถศึกษาข้อมูลเพิ่มเติมได้จาก artisan
* View Composer ส่วนของ Code HTML ที่นำมาเรียงติดต่อกัน และจะทำงาน หลังจากประกอบกันเสร็จเรียบร้อยแล้ว เช่นเราแบ่งส่วน header, container, footer และนำมาเรียกใช้ต่อกันภายหลังเป็นต้น
* Routing สามารถกำหนดชื่อของ Url เพื่อชี้ไปยังส่วนต่าง ๆ เช่น View หรือ Controller ตามที่ต้องการได้คำสั่งอ่านและเข้าใจง่ายมากสามารถศึกษาข้อมูลเพิ่มเติมได้จาก Routing
สรุป
Laravel เป็นโครงสร้างเว็บแอปพลิเคชันที่ใช้ภาษา PHP ในการจัดวางได้ดี และกำลังเป็นที่นิยมอย่างแพร่หลายในกลุ่มนักพัฒนาต่างๆ หรือ เหมาะสำหรับนักพัฒนากลุ่มใหญ่ อีกทั้งยังง่ายต่อการพัฒนาเว็บแอปพลิเคชันอีกด้วย เพราะมีการจัดวางโครงสร้างไว้ให้พัฒนาเว็บแอปพลิเคชันได้อย่างง่ายดาย สุดท้ายแล้ว Laravel Framework ก็เป็นอีกทางเลือกหนึ่งสำหรับมือใหม่ เพราะสามารถเขียนโครงสร้างได้ง่าย แต่ทั้งนี้ก็ขึ้นอยู่กับความเหมาะสมของแต่ละงานนั่นเอง หวังว่าทุกคนจะได้รับข้อมูลที่ดีและนำมาประกอบการตัดสินใจ ในการใช้งาน Laravel มากขึ้นนะครับ
ที่มา :https://dev.classmethod.jp/articles/lets_get_to_know_laravel/


